Lab 3: Agent Desktop
Overview of the lab:
In this Lab, we will go through the portals that Agents and Supervisors use in their daily basis. We will review how to complete the main tasks of both roles and some advance features will be introduced. By following each of the steps, you will have better understanding of the new Agent Desktop and learn the available reporting features for Supervisors.
Table of Contents
Introduction
Lab Objective
-
The objective of this lab is to get an idea about the Agents and Supervisors user journey, to familiarize with the platforms they use and to explore some of the most useful new features they offer.
-
In the first part of the lab we will focus on the Agent Desktop, we will customize the logo and title of the platform and also add a widget in the nav bar section.
-
Later, in the second part, we will see the different reporting dashboards that Supervisors can see through the Management Portal and perform some action on the Agents
Pre-requisite
- You need 2 devices where you can install Webex Calling (example: PC or Mac and Mobile).
- For doing this lab, you must first complete the Lab 1: Control Hub and Admin Portal:
- You have the administrator’s access to the Tenant Management Portal.
- Agent and Supervisor users created and configured
- You have agent’s access to the Agent Desktop
- You have the supervisor’s access to the Tenant Management Portal.
- Agent is part of 2 Teams.
- Webex Calling extensions are assigned to a WxCC users (agent and supervisor).
- You also must complete the Lab 2: IVR Contact Routing:
- Simple flow configured and making a call tested
Quick Links
Control Hub: https://admin.webex.com
Portal: https://portal.wxcc-us1.cisco.com/portal
Agent Desktop: https://desktop.wxcc-us1.cisco.com\
Lab Section
Part 1: Agent Desktop
| Entity | Name |
|---|---|
| User Profiles | Agent Profile <ID> |
| Agent | agent1_<ID>@mailinator.com |
NOTE: Your <ID> is provided in the email in the “Attendee ID” line.
1.1 Introducing the Agent Desktop Interface
Watch the following video, where each of the sections and their main options are explained. You will get a better idea of how the Agent Desktop look like and how to use it.
Note: In this section you don’t need to do any tasks. This section was created to familiarize you with the agent interface.
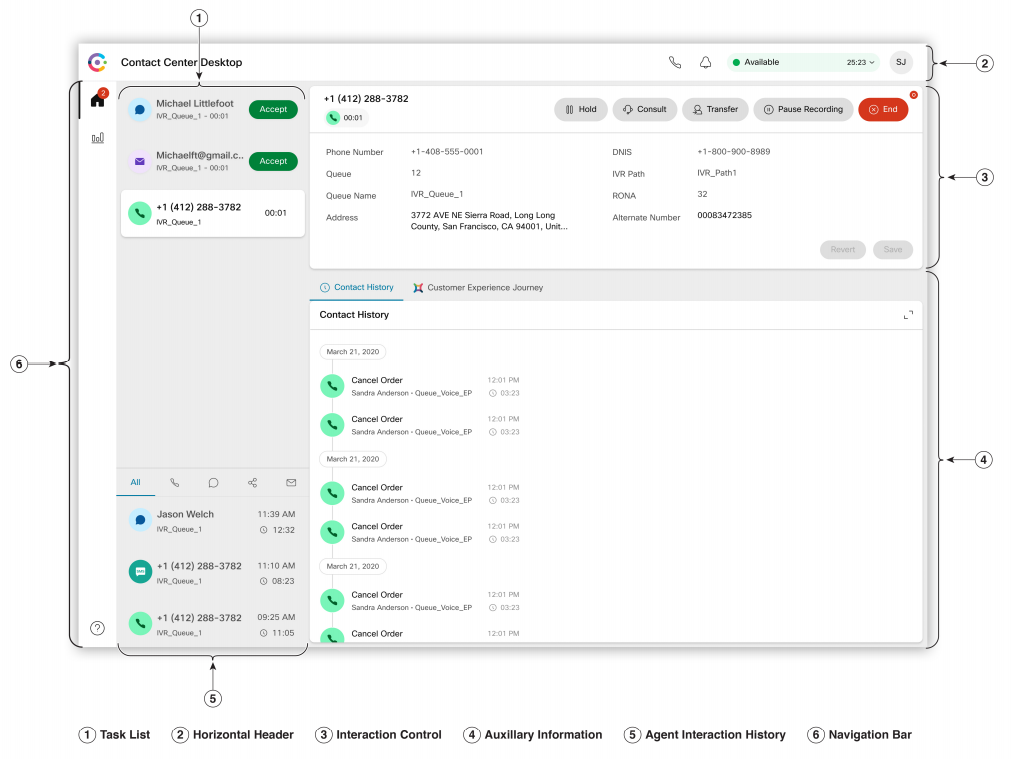
The Agent Desktop is divided in 6 sections. In the image above you can see a general view of the Agent Desktop and where each section is located. We explain them all shortly:
- Task List: When a request is routed to your queue and you are Available, a new request appears in your Task List pane. You must accept the requests to start communication with the customer.
- Horizontal Header: Basic functionalities such as: Title and logo, Agent availability state, Notification Center, Outbound Call and User Profile. We will explain more in detail some User Profile options in the next section of the lab.
- Interaction Control: When you accept a voice call (inbound or outbound), by default, the Interaction Control pane is expanded. This pane includes: customer information (CAD variables), timers (for example: connected and call on hold time) and call control buttons (Record, Hold, Transfer…).
- Auxiliary Information: This section only appears when you accept an email, chat or social messaging conversation request, not for Voice requests. The center pane displays details based on your selection of the contact card in the Task List panel.
- Agent Interaction History: You can view your previous communications with a customer across all the channels (voice, email, chat, and social) in this pane. The pane displays details for the last 24 hours.
- Navigation bar: By default you can find the following icons here: Home, Agent Performance Statistics and Help. However, you can customize it and add some additional icons and widgets.
1.2 Create a Custom Desktop Layout
Watch the following video to learn the dekstop layout customization process. After the video, you will be able to customize the Agent Desktop with your company logo.
1. Download default desktop Layout
-
Login to https://portal.wxcc-us1.cisco.com with admin credentials.
-
Navigate to Provisioning –> Desktop Layout.
-
Click on ellipses
...of Global Layout and select Edit. -
Click on Download button to download the Default Desktop Layout.json file.
2. Customize default desktop layout with logo and title
-
Open the Default Desktop Layout.json file with any text editor (e.g. Notepad or Sublime text).
-
Modify the appTitle key value with your company name in order to change Agent Desktop title.
-
Modify the logo key value with your company logo URL or use this https://raw.githubusercontent.com/wxcctechsummit/holcct2100/main/labslive/CiscoLiveLogo.jpg.
-
Save As the JSON file with a distinguishable name.
3. Upload the custom desktop layout and associate it to a team
-
Go as admin to Desktop Layout module in the Tenant Management Portal.
-
Click on New Layout.
-
Provide the following name:
CustomDesktopLayout_<ID>_CL. Your <ID> is provided in the email in the “Attendee ID” line. -
Select
Team2_<ID>_CLas Team. -
Click Upload button to upload the modified JSON file.
-
Click Save button to apply the layout.
4. Verify the new custom desktop layout
-
Login in the Agent Desktop.
-
Open the User Profile and click on the arrow
>under Team. -
Change the team of the agent to
Team2_<ID>_CL. -
Click on Save Team Selection.
-
Confirm the changes by clicking on Change Team.
-
Wait some seconds to see the results. Now you should get a new log icon in the left upper corner.
1.3 More advance example
1. Upload the custom desktop layout and associate it to a team
-
Download the custom JSON file.
-
Go again to Desktop Layout module in the Tenant Management Portal.
-
Click on New Layout.
-
Provide any preferable name and description.
-
Select
Team1_<ID>_CLagain as Team. -
Click Upload button to upload the modified JSON file.
-
Click Save button to apply the layout.
2. Verify the new custom desktop layout
-
Go back to the Agent Desktop and change the team to
Team1_<ID>_CL. -
Explore the new Desktop Layout, new widgets have been added.
-
You can play with the sizes and distribution of the new widgets.
-
This is just an example of what you can achieve with custom desktop layouts, you can design really advance features.
Part 2: Supervisor
| Entity | Name |
|---|---|
| User Profiles | Supervisor Profile <ID> |
| Supervisor | supervisor1_<ID>@mailinator.com |
NOTE: Your <ID> is provided in the email in the “Attendee ID” line.
2.1 Portal’s Dashboards
The following video outlines the existing dashboards available to the supervisor in the management portal. Follow the instructions to find out which dashboards are available and what they are for.
1. Management Portal with Supervisor account
-
Make sure the agent is logged into the agent interface https://desktop.wxcc-us1.cisco.com/
-
Make the agent Available by selecting the appropriate state in the upper left corner.
-
Navigate to https://portal.wxcc-us1.cisco.com/portal in a new browser tab (Private mode)
-
Enter the Username and Password of the Supervisor created in the first lab.
-
Ensure that browser pop up blockers are not blocking the Admin Portal pop up. The
Entry Point - Site leveldashboard has to be shown on the landing page. -
Make sure there are more than 0 agents listed in the AVAILABLE AGENTS field.
-
Make a new call to your EP. After starting IVR, you will see this value in the IN IVR field.
-
Now redirect your call to the queue with the agent. Make sure the agent answered this call. You should see a value of 1 in the CONNECTED field.
-
Navigate to the agent desktop, end your call and move your agent back to the Idle status. Nobody should be in Available status.
2. Contact Center Overview - Realtime
-
Go back to the portal’s dashboard and select the second dashboard
Contact Center Overview - Realtimein the upper left corner. -
Make a new call to your EP and wait until the call reach a queue.
-
Check the new data on the Realtime dashboard. Now, this call will be presented in the table Contact Details in the Queue. In addition, the value will increase in the Longest Contact Currently in Queue chart.
3. Contact Center Overview - Historical
-
Select the third dashboard
Contact Center Overview - Historical. You will be able to see the same information but from the historical perspective. By default the informaiton is shown for the last 7 days. Change the Duration filter to This Year in the upper right corner. -
Open the help guide by clicking on the supervisor account in the upper right corner and select the Help option.
4. Agent State Data – Realtime dashboard
-
Select the 4th dashboard
Agent State Data – Realtimein the upper left corner. -
Now the agent has to be presented in the Agent State Data dashboard.
-
Manually refresh dashboard data by clicking on Stop Refresh button. As the result, the time since last refresh will be restarted.
2.2 Permissions and remote agent logout
Here we go through the newly added dashboard. We will learn how to change supervisor permissions and how to manually log out agents by using a supervisor account.
1. Remote Agent Logout
-
To log out an agent, in the
Agent State Data – Realtimedashboard, click Sign Out button in the Action column. -
Make sure that you receive a notification that the agent has been successfully logged out.
Note: You can log out agents who are in the Available, Idle, or Not Responding. If the agent is in a Connected state the Sign Out button will not be available.
- Go to the Agent Desktop_ and verify the agent status. He should receive the notification that the supervisor has signed him out.
2. Supervisor’s User Profile
-
Make sure the agent is logged back into the agent interface. During the agent login select the
Team2_<ID>_CL. -
In the Management Portal_, navigate to Provisioning and select User Profiles.
-
Click on dots
...infront of Supervisor Profile and select Copy option. -
The new User Profile page will be presented. Set the Name base on your Attendee <ID>
Supervisor Profile <ID>. -
In the User Profile page click on Access Rights.
-
In Teams field set only team1
Team1_<ID>_CLand click Save. -
Navigate to Provisioning, select Users and modify your supervisor account.
-
In front of the current supervisor
supervisor1_<ID>@mailinator.comclick on..., to launch the Edit view for a particular User configuration. -
Select a created profile
Supervisor Profile <ID>in the User Profile drop down list and hit Save. -
Log-out and log-in again in to apply the new supervisor profile settings.
-
Verify that there are no agents in the
Agent State Data – Realtimedashboard with a new profile. -
Go to the agent desktop and change the team settings. Switch the agent to
Team1_<ID>_CL. -
In the agent dashboard click the Auto Refresh button and make sure the agent appears.